Showing posts with label Second Hand. Show all posts

Friday, January 6, 2012

Oh No Not Another Doily Idea! (oh but this ones a goodie!)

I'm sick in bed today, this is day 3 of an awful flu type thing. Hot and cold sweats are so much worse in 27 degree heat! I always seem to get sick after a crazy busy spell. I can almost pinpoint when it will happen. And what a crazy busy spell its been! Two (very last minute) craft fairs in which I had no time to plan, Luca's First Birthday, family staying, Christmas presents to make and then Christmas! Cleaning our house to rent it out over New Year, packing up and staying with my parents, 3 nights at Gisborne's New Year festival Rhythm and Vines (this has been going for 9 years in Gisborne) this year had a sell out crowd of 29,000. I have gone to all but 2 of them. We were given VIP tickets this year and I have to say I will not be going cattle class again. I am getting too old. Anyway so it has been a very very very busy couple of weeks and I am now utterly exhausted. Lucky I have a few creations up my sleeve to blog about, and keep me from feeling totally useless while I am stuck in bed!

Yes, another Doily Idea! Organic Cotton Stretch with Doily Knee patches. I had these little doily circles left over from my DIY Doily Dress and came up with idea for my Cousins newest addition, a little girl who was born in December.
Just simple Organic Cotton Stretch with a doily circle on each knee


Girls clothes a so much fun :)

Happy New Year Everyone.


Tuesday, November 29, 2011

Garage Sales, 2nd Hand Shops... My Weakness

When I can I try and get to the various garage sales on Saturday morning here in Gisborne. Some weeks are disappointing and some are fabulous! Check out my finds this week:
Favourite find by far for a long time! ONLY $5 
Watch out soon for a before and after on this baby.

LOve love love it! (p.s garden coming soon!)

A bike for Matt - our last garage sale one (which was so retro and awesome) got stolen! 
a great steal for $5.

bill doily table cloth.... can't remember how much? maybe $5?

ah yes more doilies! 50cents each.. couldn't not get them ;)

Little wooden handled zester. $1

Gorgeous little enamel pouring pot (what are these called?) a couple of dollars

Textured amber glass jug... because who can have enough jugs.... 
my husband may disagree with this..

And Another wool blanket. $5. Because who can have enough wool blankets...
no really they are great!

and just a little add on... It's Matts (husband) Birthday today. Here's the cake we took to his work this morning :) 


Thursday, November 17, 2011

DIY Doily Dress

I have been meaning to post this all week... except I never remember to take photos of the finished garment when I'm actually wearing it out! I am really happy with how this dress turned out as not all my own designs do... 
My first idea came from my cousins blog when I saw the cut up doily she had left over from some christmas decorations she had made. I thought, hey that looks like a purpose built neck line for a top or dress... 
I rummaged through my little pile of doilies and found this one

I snipped out the centre..

rummaged through my stash of fabric and decided this lilac organza would fit the bill.

I am "borrowing" my mums dressmaking dummy and I tell you it makes designing/fitting clothes a breeze! 

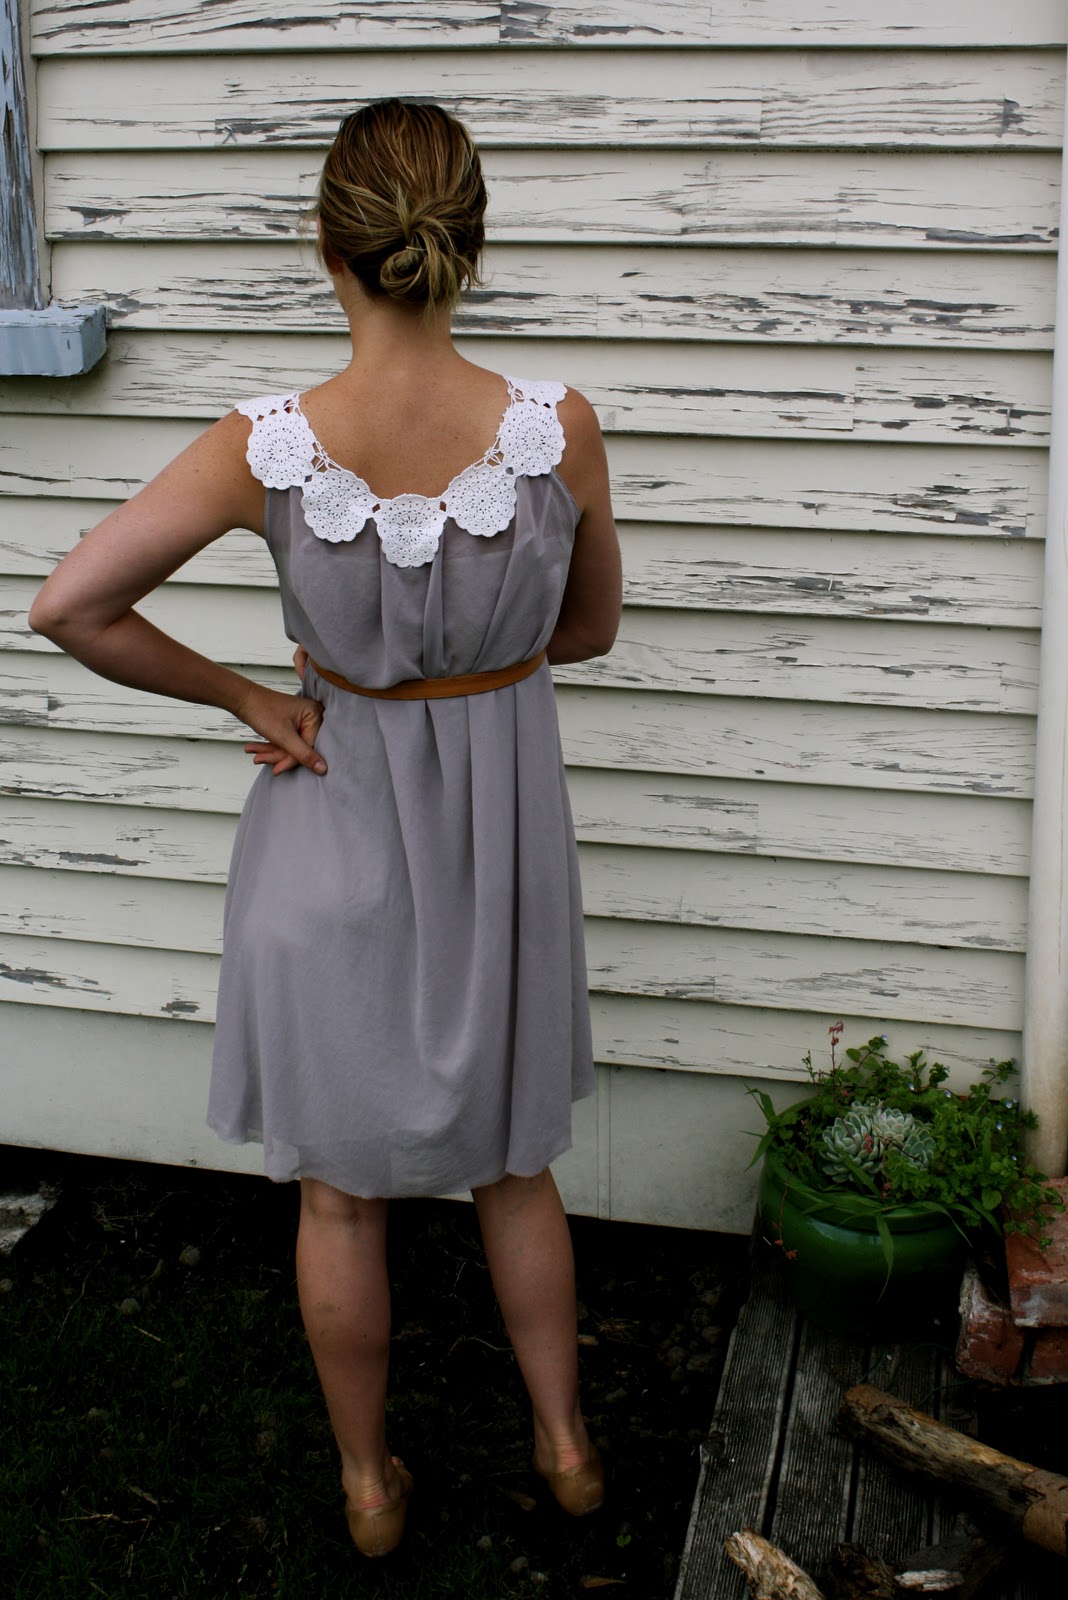
I literally took the length of fabric - about 1.5 meters and chopped it in half pinned it to each side of the doily with a few gathers on each boob and one in the centre back. Pinned the side seems loosely and it was ready to be sewn.. 

Here it is before i had sewn it, I decided after to cut it just above the knee. I didn't even hem it... probably will have to at some point though!

Here it is, worn with a tan leather belt and some peep toes. 

I really like the scooping back too :)

I wore it out on Friday night, Matt and I had a very rare night out at a Christmas party and it's definitely a party dress...  Now I just need to find a few more occasions to wear it too, and work on the hang over it gave me!
xox


Sunday, November 13, 2011

Christmas Ornament Swap: Made.

As I mentioned in a previous entry, I have entered into a Christmas Ornament Swap. We have been put into groups of 5 or 6 and by the 1st of December we have to send a home made ornament to each of the members in the group. Basically you end up with 6 different home made ornament at the end - lots of fun... and how doesn't love getting presents in the mail :)
What to make!? There seemed to be too many options I just could't commit to one... but I just got on with it today.. and I'm pleased I did!
One of my first ideas was to make mini bunting flags so I rummaged through my fabric stash and found a bunch of things that seemed to marry together well. Here's how I went:

 All the items I used were from second hand shops, isn't it so satisfying when you can make something entirely out of thrifted materials! Nothing bought new. 

I cut long strips of both fabric

using pinking scissors to avoid having to hem the flags... 

6 bunting ready to sew..

probably should have ironed them..

Ta-da!


had to take a shot with my hand in there so you can get an idea of how tini tiny they are :)

I'm feeling a little more christmas-y after this little project... must start on actual christmas pressies next.

Ci Vediamo!

Thursday, November 3, 2011

Cotton Candy! From Sheet to Shorts...

I have been collecting the odd cotton sheet from 2nd hand stores / Thrift stores for sometime now. If you can find one in good condition, without the worn middle then you have yourself a huge piece of fabric to play around with. I mostly look out for vintage floral ones, but this week I found this delicious cotton candy striped one. The cotton is fantastic quality and is still lovely and thick. The colours are "me" too. Although I did intend to make the boys pants/shorts from it.. I thought no, I will make something for me this time.
I found a pattern from one of my Burda magazines and got to it....

How cute is that sheet! $3 from The Sallys!

 Cotton Candy

My new sewing toy.... great time saver!

a dotty guide to cut out

Finito!


So what do you think? 

Sunday, October 30, 2011

Garage Sale Score: Before / After

So I went garage sale-ing on the weekend... haven't been in a while and to be honest it wasn't as exhilarating as it can be. Anyway I managed to find a few things, including this gold mirror....

Yes i managed to see potential and decided it might be a quick DIY challenge. Heres what I did:
First I took it apart, screwing the back off and taking out the mirror.

 Then I gave it 2 coats of white pant (using a finer paintbrush for the final coat)

And thats it - easy! Put it all back together...


.... e finito!

Vintage Sprinkle Skirt

I found a little beaut at The Sally's on Friday - this cute skirt. It reminds me of cupcake sprinkles! Love the colour too! Here are a few pics...
 . . .
 . . .
. . .

We had an awesome day at the beach yesterday, it was beautifully sunny then a big black cloud came rolling in and created a magical light. It was crazy for me to think I grew up in Gisborne, yet only been to this particular beach a handful of times.. We will definitely be going back soon. 
 Summer is here finally, the boys have swam in the sea twice this week, I might even get in next time. Better work on my pasty complexion with some fake tan first though!  

. . .
. . .

Another weekend gone. Next weekend we're off camping! Yay! Any tips for camping with two littlies! EEEEK....


Sunday, October 16, 2011

Tutorial: Play Shorts from Business Shirt

So I actually made these to be apart of KCWC but I got a bit busy with family towards the end of the week and didn't end up posting them..

I love recycling and repurposing clothes. Its so easy to do and makes me feel good that I'm throwing less away or reusing something that someone else has thrown away..

First find yourself an old Shirt....
I bought this one for Matt at a secondhand store for a dollar but got it home and realised it was a womans shirt, so into the fabric pile it went...

Next, get your pattern pieces, I have used a Burda kids pants pattern folded up to make shorts, Cut you pattern pieces from the shirt.... 

I placed the pattern right down on the hem so I didn't have to hem the shorts (: Lazy I know. But anything to make it faster! 
I cut my pockets out of an old pillow case just to add a bit more colour and detail. 

Next, Sew your pockets on to each front panel. and topstitch them to make a tidy finish.

Now place your two front pieces right side together and pin. Overlock and sew seem.


If you have a pockets on the old shirt your using, cut one (or both!) off and sew it on to one of the back panels. 

Next, place back panels together, right sides together and pin. Overlock then sew seem. 


Now your almost ready to sew both sides together, but first, if you have pockets you will need to pin them in place and top stitch the pockets so they don't move. 


Next, place front and back panels together right sides facing and pin in place. Overlock and sew seems together.


Now you will need to cut a piece of ribbing for the waistband. Measure it around you  boys waist to get a firm fit. Sew the waist band in a loop and fold it over so the seem is hidden.
Now pin the waistband to the shorts, line up the waistbands seem and the back seem to begin with then pin from there in even intervals. Overlock and sew waistband onto shorts stretching the ribbing as you sew.

Finally topstitch the waistband in place. Tidy up all excess tread and your done :)


Thanks for viewing :) Hope I made sense!